Wi-Fi
Doxie Q has built-in wireless networking technology, so you can sync scans wirelessly to your Mac, PC, iPhone, or iPad.
To turn on Wi-Fi, hold down the Scan button on the control panel for 3 seconds. If the beeper is on, you will hear three beeps. When the network is ready, the blue LED will light up, and a wireless icon will appear solid on the LCD screen.
After you are finished with downloading scans, turn off Wi-Fi by holding down the Scan button again. Since Wi-Fi takes up a lot of power and is only used to download scans, we highly recommend turning it off when not downloading scans.
Joining Doxie's own Wi-Fi network
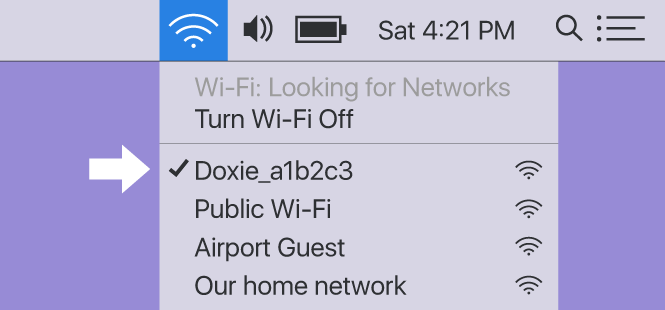
By default, Doxie creates its own Wi-Fi network you can join to access your scans called Doxie_XXXXXX (where XXXXX is a unique network ID associated with your Doxie).
Wait for the blue LED to light up after turning on Wi-Fi. Then, connect your Mac, PC, or iOS device to Doxie's network from the menu bar or in settings. Your device needs to be on the same network as Doxie to access your scans.
Next...
Once your device is on the same network as your Doxie, you can access your scans and import them using Doxie's included apps for Mac/PC or iOS.
Configuring Doxie to join your local Wi-Fi network
You can optionally configure Doxie to join your home or office network. If you use your Doxie in frequent locations like these, it definitely makes sense to join Doxie to your network -- this way, you won't need to join Doxie's own network in the future.
When you turn on Doxie in range of a configured network, Doxie will join that network and skip creating its own network. If, however, it doesn't find a configured network, Doxie will assume you're out and about and create its own network temporarily so you can access your scans on the go.
Read more about how to configure Doxie to join a local network here.
Need a hand?
We're here to help! Check out the FAQs, contact us for help, or have us call you for personal assistance.