Doxie's LED flashes green when I try to scan.
The flashing green light could mean a couple of different things depending on how quickly it's flashing.
-
A fast green flash means that your Doxie is having trouble reading your SD card.
-
A slower green flash just means that your Doxie's battery is low, and needs some time to charge.
Here's detailed information on Doxie's status lights.
Below, I have some tips for fixing a fast green light on your Doxie -- starting with the most likely causes.
- First, make sure the SD is inserted in the back of Doxie. This card serves as Doxie's memory, so you won't be able to scan without it.
- If you're using a different card than the one that came with Doxie, double-check that the card is either 32GB or smaller. Cards larger than 32GB won't work.
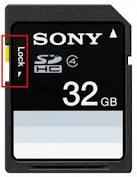
- Now, let's check that your card is unlocked. Below is a picture with a red outline to show where the lock latch is located on your SD card.